
Canva is a beginner-friendly design tool that lets you create everything from social media posts to full-page layouts—no advanced skills required. WordPress, a powerful website platform, powers millions of websites worldwide. When combined, they offer a simple yet effective way to convert Canva to WordPress and bring your designs to life online.
Whether you’re designing a banner, infographic, or full layout in Canva, this guide will help you export Canva to WordPress easily. You’ll learn how to convert Canva to a WordPress website, including how to export your Canva design, prepare HTML if needed, and make your content look great across all devices. For those looking to go deeper, we’ll even touch on how to go from Canva to HTML before placing it inside WordPress.
Prerequisites
Before starting the process, you’ll need a few things in place. These are basic tools that will help you move your Canva designs to your WordPress site quickly and smoothly.
- A Canva account (free or Pro)
- A WordPress website (either self-hosted or via WordPress.com)
- Access to the WordPress admin dashboard
- Optional: Canva Pro (for extra export features like transparent backgrounds)
- A modern web browser and internet connection
Step 1: Access Your Canva Design
To begin, you need to access the Canva project you want to export. Canva saves all your designs in the cloud, so it’s easy to pick up right where you left off.
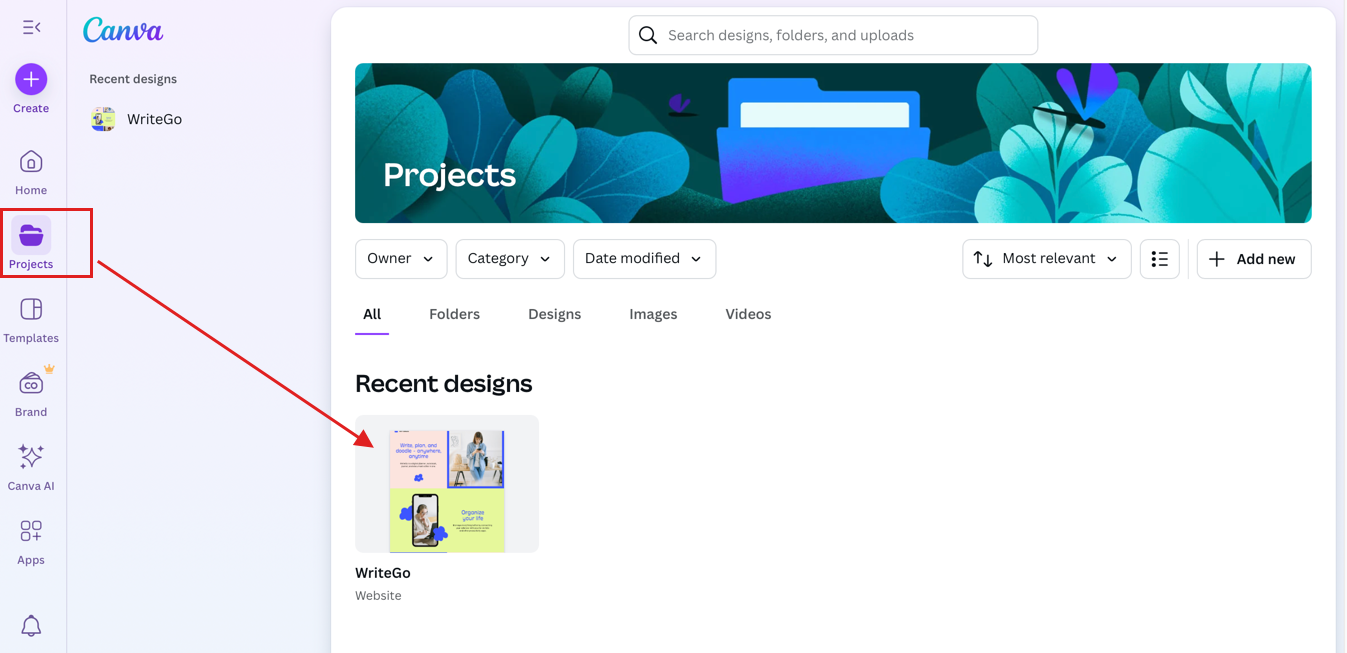
- Log into your Canva account.
- Go to the “Projects” tab or search for the design you want to transfer.
- Click to open and review it for accuracy—make sure text is readable and the layout looks correct.
Step 2: Exporting from Canva
Now that your design is ready, it’s time to export it. Canva allows you to download your designs in several formats. Choosing the right one depends on what you plan to do with the image on your site.
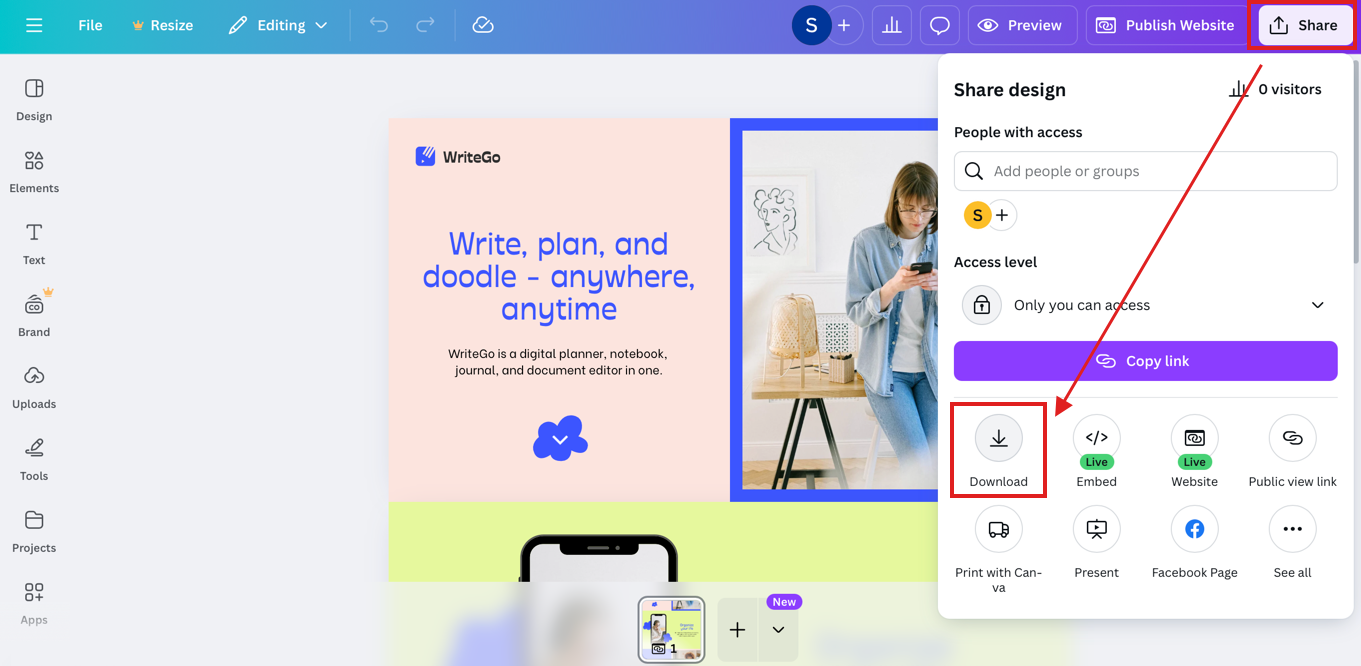
- Click the “Share” button in the top-right corner.
- Select “Download” from the dropdown menu.
- Choose your file type:
- PNG – Best for high-quality images and graphics.
- JPG – Good for web use with smaller file sizes.
- PDF – Ideal for print or downloadable resources.
- If available (Canva Pro), check “Transparent background” if your design requires it.
- Click “Download” to save it to your computer.
Step 3: Preparing WordPress
Before uploading your design, log into your WordPress site and navigate to the section where you want to use the image. You can either upload it directly to the Media Library or insert it during post/page creation.
- Log in to your WordPress admin dashboard.
- From the sidebar, click Media > Library.
- You can also go directly to Posts or Pages if you’re ready to place the design in content.
👉 Tip: It’s a good idea to optimize your image (reduce file size) before uploading for better site speed.
Step 4: Uploading to WordPress
With your Canva design exported, it’s time to upload it to your WordPress site. This ensures the image is stored on your server and ready to be used in any post or page.
- In your WordPress dashboard, go to Media > Add New.
- Drag and drop the design file or click Select Files to browse and upload.
- Once uploaded, click on the file to view details or copy the file URL for later use.
Step 5: Inserting the Design into a Post or Page
Now that your image is in the media library, you can insert it into any WordPress post or page using the block editor. This is where your Canva design will finally go live.
- Go to Posts or Pages and click Edit on the page where you want the image.
- In the editor, click the “+” button and choose the Image block.
- Select “Media Library” and choose the uploaded image.
- Adjust alignment, image size, and captions as needed.
- Preview your changes and make sure it looks good on desktop and mobile.
Step 6: Adjusting Settings
After inserting your design, fine-tuning it helps with both appearance and performance. These small tweaks ensure your site remains accessible, responsive, and SEO-friendly.
- Use the sidebar settings to resize or set margins.
- Add alt text (important for accessibility and SEO).
- Choose whether to link the image to a file, page, or custom URL.
- Check how it looks on mobile and tablet using WordPress’s preview modes.
Need a Project Estimation?
Get a quote from XHTMLTEAM before converting your Canva to WordPress website.
Common Issues and Troubleshooting
Even with the easiest tools, things don’t always go perfectly. Here are some common issues beginners face and how to fix them:
Image won’t upload?
- Ensure the file size is under 2MB.
- Double-check that the format is supported (JPG, PNG, etc.).
Image looks blurry?
- Try exporting from Canva at a higher resolution (2x).
- Use PNG format for crisp visuals.
Image layout breaks on mobile?
- Use responsive blocks or check mobile preview.
- Avoid uploading oversized designs—resize within Canva first.
Conclusion: Canva to WordPress
That’s it! You’ve now learned how to transfer your visual creations from Canva to WordPress—step by step. This process makes it easy to maintain visual consistency, engage your audience, and save time. As you get more comfortable, you can explore more advanced integrations like embedding Canva presentations or turning full layouts into web pages.
Design in Canva. Publish in WordPress. The creative possibilities are endless.